
Getting a flat tire can happen to anyone — whether you’re driving to work, riding your bike, or mowing your lawn. In moments like that, knowing how to change a tire isn’t just a useful skill; it’s something that can save you time, money, and stress. You don’t need to be a mechanic to handle it — just a bit of confidence and the right guidance.
This step-by-step guide will show you exactly how to change a tire safely and correctly, whether it’s on a car, bicycle, motorcycle, or even a mower. You’ll learn what tools to keep handy, how long it typically takes, and how to do it the right way without damaging your vehicle or risking your safety.
Whether you’re stuck with a flat tire on the roadside or simply want to be prepared for emergencies, this guide will walk you through the process so you can get moving again — calmly and confidently.
How Long Does It Take to Change a Tire?
One of the first questions people ask when dealing with a flat is, “how long does it take to change a tire?” The short answer is — it usually takes about 15 to 30 minutes to change a tire on a standard car. However, that time can vary depending on several factors such as your experience level, the type of vehicle, and the tools you have available.
If you’ve never changed a tire before, it might take closer to 40 minutes the first time as you learn each step carefully. On the other hand, someone who’s done it before or has proper tools — like a hydraulic jack and an impact wrench — can often finish the job in under 15 minutes.
Other conditions also play a role. Changing a tire on a flat, dry surface during daylight is much easier than doing it on a busy roadside or in bad weather. The same goes for larger or specialized vehicles like motorcycles, bicycles, or mowers — some take more time simply because of different tire types and mounting methods.
In general:
- Car tires: 15–30 minutes
- Motorcycle tires: 20–40 minutes
- Bicycle tires: 10–20 minutes
- Mower tires: 10–25 minutes
So, when you find yourself with a flat, remember that with a bit of patience and preparation, changing a tire is a quick, manageable task that anyone can handle with confidence.
Tools You’ll Need Before You Start
Before learning how to change a flat tire, make sure you have these ready.
Before you start changing a tire, having the right tools makes the entire process faster, safer, and far less stressful. You don’t need a full mechanic’s workshop — just a few essential items that most vehicles already come equipped with. Still, it’s smart to double-check your toolkit so you’re never caught unprepared.
Here’s what you’ll need:
- Spare Tire (or Donut Tire) – This is the tire you’ll be installing to replace the flat one. Make sure it’s properly inflated and in good condition.
- Car Jack – Used to lift your vehicle off the ground. Most cars come with a scissor jack, but a hydraulic jack can make the job easier and quicker.
- Lug Wrench (Tire Iron) – This tool helps you loosen and tighten the lug nuts that hold the tire in place. A cross wrench gives better leverage than the basic one often included with cars.
- Wheel Wedges or Bricks – Placed behind the tires to prevent your car from rolling while it’s jacked up. Safety first!
- Owner’s Manual – Every vehicle is a bit different. The manual tells you where the jack points are and offers specific safety notes.
- Flashlight or Headlamp – Essential if you need to change a tire at night or in low light.
- Gloves – Keep your hands clean and give you a better grip on tools.
- Reflective Vest and Warning Triangle – These keep you visible to other drivers, especially on highways or at night.
If you’re changing a bike, motorcycle, or mower tire, the tools may vary slightly — for example, you might need tire levers, a hand pump, or a bead breaker. But the idea remains the same: preparation equals safety and efficiency.
Having these tools ready ensures that when a flat tire happens, you can handle it calmly, efficiently, and without unnecessary risk.
How to Change a Tire on a Car? (Step-by-Step Instructions)

Knowing how to change a tire on a car is one of those basic life skills that can save you from a stressful situation on the road. Whether you’re dealing with a sudden flat or just replacing worn-out tires, following the right process ensures both safety and success.
Here’s a complete, step-by-step breakdown of how to change a spare tire the correct way:
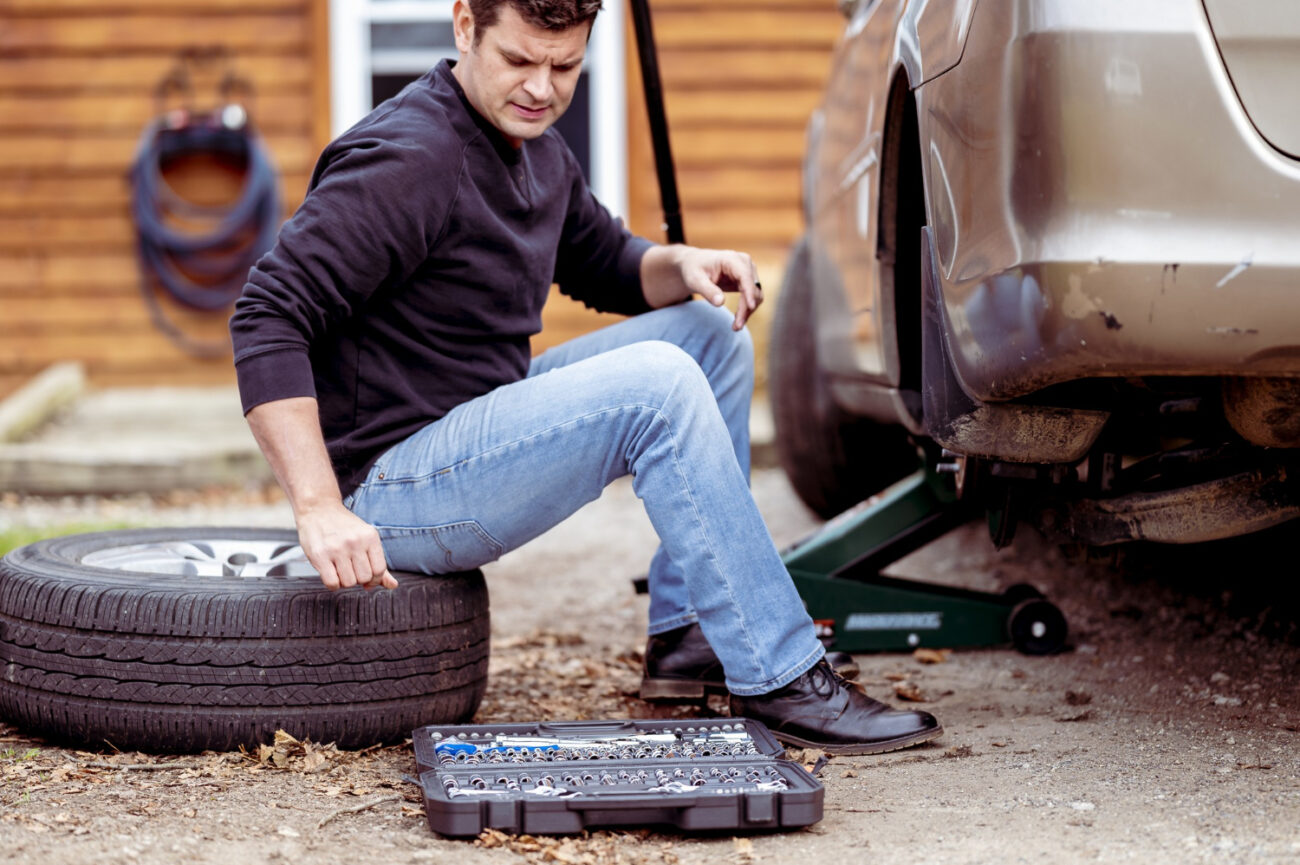
1. Park Safely and Turn On Your Hazard Lights
The first and most important rule is safety. Pull your car over to a flat, stable area away from traffic. Avoid soft ground or slopes where the car might roll. Turn on your hazard lights to alert other drivers, and apply the parking brake. Place wheel wedges behind the tires to keep the vehicle from moving.
2. Loosen the Lug Nuts
Before you lift the car, use your lug wrench to slightly loosen the nuts holding the wheel in place. Turn them counterclockwise, but don’t remove them completely yet. It’s easier to break them loose while the tire is still on the ground.
3. Jack Up the Car
Position the jack under the correct jacking point (you can find it in your car’s manual). Slowly raise the car until the flat tire is about six inches off the ground. Never crawl under the car while it’s on the jack.
4. Remove the Flat Tire
Now that the car is lifted, finish removing the loosened lug nuts and set them aside in a safe place. Gently pull the flat tire straight off the wheel bolts and lay it flat on the ground to prevent it from rolling away.
5. Mount the Spare Tire
Lift the spare tire and align it with the wheel bolts. Slide it onto the hub until it’s fully seated. Put the lug nuts back on by hand — just enough to hold the tire in place securely.
6. Tighten the Lug Nuts
Using your wrench, tighten the nuts in a crisscross pattern (for example: top, bottom, left, right). This ensures even pressure and keeps the wheel balanced. Tighten them only halfway while the car is still lifted.
7. Lower the Car and Check Tire Pressure
Carefully lower the car back to the ground using the jack. Once the tire touches the road, remove the jack and finish tightening the lug nuts firmly. Finally, check the tire pressure of your spare; if it’s a temporary “donut” tire, keep your driving speed under 50 mph and replace it with a full-size tire as soon as possible.
Learning how to change a tire on a car doesn’t just prepare you for emergencies — it also builds confidence in handling minor car issues independently. By following these how to change a tire instructions, you’ll be back on the road quickly and safely every time.
How to Change a Flat Tire? (When You’re on the Road)
Getting a flat tire while driving can be stressful, but staying calm and knowing how to change a flat tire safely makes all the difference. The key is to prioritize safety first — both for yourself and for other drivers — before starting any repair.
1. Find a Safe Spot to Stop
As soon as you notice a flat tire, slow down gradually and look for a safe, flat area away from traffic. Avoid sudden braking or sharp turns. If you’re on a busy road, try to reach a nearby parking lot or shoulder with enough space to work safely. Always turn on your hazard lights to alert oncoming vehicles.
2. Secure Your Vehicle
Once parked, apply the parking brake and place wheel wedges or bricks behind your tires to prevent rolling. If you have a reflective vest or safety triangle, place it several feet behind your vehicle to make yourself visible to other drivers — especially at night or in bad weather.
3. Gather Your Tools
Take out your spare tire, jack, lug wrench, and any other tools you need. If you have gloves or a flashlight, now’s the time to use them. Having everything ready before you begin helps you work efficiently and safely.
4. Replace the Flat Tire
Follow the same process outlined earlier:
- Loosen the lug nuts slightly while the tire is still on the ground.
- Jack up the car using the designated jacking point.
- Remove the flat tire carefully.
- Mount the spare tire, tighten the lug nuts by hand, then lower the car and secure them fully in a crisscross pattern.
5. Check the Tire Pressure and Drive Carefully
Once the new tire is on, check its air pressure. If it’s a temporary spare (donut), drive slowly — under 50 mph — and avoid long distances. These spares are designed for short-term use only, so replace it with a regular tire as soon as possible.
6. Stay Aware of Your Surroundings
If you’re unable to change the tire safely — for example, on a narrow highway or at night without proper visibility — it’s better to call for roadside assistance. Your safety should always come first.
Knowing how to change a flat tire on the road gives you confidence in emergencies and helps you handle unexpected situations without panic. With the right precautions and a bit of practice, you can manage the entire process quickly, safely, and efficiently.
How to Change a Tire on a Rim?
Learning how to change a tire on a rim is slightly more advanced than changing a spare tire, but it’s a valuable skill for those who want to save time or handle small repairs at home. This process involves removing the old tire from the wheel rim and mounting a new one — something commonly done in tire shops but possible to do manually with the right tools and technique.
1. Deflate the Tire Completely
Start by removing the valve cap and pressing the pin inside the valve stem to let all the air out of the tire. Make sure it’s fully deflated before moving on — this prevents pressure buildup and makes removal easier.
2. Break the Bead Seal
The bead is the inner edge of the tire that sits tightly against the rim. To remove the tire, you’ll need to break this seal.
- Place the tire flat on the ground.
- Use a bead breaker tool or carefully apply pressure with a heavy object like a board and your body weight.
Repeat this step on both sides until the tire loosens from the rim edges.
3. Remove the Tire from the Rim
Insert tire irons or levers between the rim and the tire’s bead. Work around the tire in small sections, gently prying it up and over the rim edge. Once one side is off, flip the tire over and repeat for the other side until the tire is fully separated from the rim.
4. Mount the New Tire
Before placing the new tire, check the rim for dirt, rust, or damage. Then:
- Lubricate the rim edges and tire bead with a small amount of soapy water or tire lubricant.
- Align the tire correctly and push one side of the bead onto the rim.
- Use tire irons to guide the second side over carefully without pinching the rubber.
5. Inflate the Tire and Check for Leaks
Reinstall the valve core and slowly inflate the tire using an air compressor. You’ll hear the bead pop into place as it seals properly against the rim. Once it reaches the recommended pressure (check your tire’s sidewall), spray a little soapy water around the edges to check for air leaks. If bubbles appear, the bead may not be fully sealed.
6. When to Seek Professional Help
While you can learn how to change a tire on a rim at home, it’s not always the safest or easiest option for everyone. If the tire has internal damage, the rim is bent, or you lack the right tools, it’s best to visit a tire shop. Professionals can balance the wheel and ensure the seal is secure — preventing vibration or uneven wear later on.
Changing a tire on a rim takes patience and the right equipment, but it’s completely doable with practice. For most drivers, though, leaving this step to professionals ensures longer tire life, better safety, and proper wheel alignment.
How to Change a Bike Tire or Bicycle Tire?
Whether you’re a casual cyclist or a daily rider, knowing how to change a bicycle tire or a bike tire can save you from being stranded mid-ride. Both processes share the same goal — removing a damaged or punctured tire and getting back on the road quickly — but the tools and techniques differ slightly between bicycles and motorcycles.
1. How to Change a Bicycle Tire?
Changing a bicycle tire is one of the simplest tire fixes you can do yourself. Here’s how:
- Remove the Wheel
Shift to the smallest gear if it’s the rear wheel, then release the brake and open the quick-release lever or use a wrench to remove the axle nuts. - Deflate the Tire
If there’s still air inside, press the valve stem to let it out completely. - Pry the Tire Off the Rim
Insert two tire levers under the bead of the tire and gently work your way around until one side is off the rim. - Remove the Inner Tube
Carefully pull out the tube, starting from the valve. If there’s a puncture, inspect it by inflating it slightly and listening for air leaks. Patch or replace the tube if necessary. - Check the Tire and Rim
Look for sharp objects like glass, thorns, or nails stuck in the tire. Remove anything you find before reinstalling. - Reinstall the Tube and Tire
Insert the tube’s valve through the rim hole, place the tube inside the tire, and push the bead back onto the rim. - Inflate the Tire
Use a hand pump to inflate the tire to the recommended pressure, which you’ll find printed on the sidewall. Make sure the tire sits evenly on the rim.
With a little practice, changing a bicycle tire takes less than 15 minutes and keeps you rolling smoothly on your next ride.
2. How to Change a Bike Tire? (Motorcycle Tire)
Changing a bike tire — meaning a motorcycle tire — is a bit more challenging but still possible to do at home with care and patience.
- Stabilize the Motorcycle
Use a motorcycle stand to lift the bike and ensure it’s steady. Remove the wheel following your owner’s manual. - Deflate and Break the Bead
Remove the valve core to release all air. Use a bead breaker tool or your body weight to unseat the tire bead from the rim. - Remove the Tire
Use tire irons to carefully pry the tire over the rim edge. Take your time — motorcycle tires have stiffer sidewalls. - Inspect and Replace the Tube (if applicable)
Tubed motorcycle tires work like bicycle tires — remove the inner tube, inspect for punctures, and replace or patch it. Tubeless tires only need a new tire if there’s damage. - Mount the New Tire
Lubricate the rim edge with soapy water and mount the new tire one side at a time. Reinsert the valve and inflate gradually until the bead snaps into place. - Balance and Refit the Wheel
Once mounted, check that the tire is properly balanced before reinstalling it on the motorcycle.
Learning how to change a bike tire or how to change a bicycle tire gives you independence and confidence on every ride. With the right tools and a little patience, you’ll never have to cut a journey short because of a flat.
How Much Does It Cost to Change a Tire?
If you’ve ever wondered how much is it to change a tire, the answer depends on several factors — including the type of vehicle, where you go, and whether you do it yourself or hire a professional. Understanding these costs helps you make smart, budget-friendly decisions while keeping your safety a top priority.
Average Cost to Change a Tire
Here’s a general breakdown of what you can expect to pay in 2025 for different types of vehicles:
- Car Tires: $20 – $60 per tire for labor at a tire shop. If you’re getting new tires installed, the total may range from $100 to $300 depending on brand and size.
- Motorcycle Tires: $25 – $50 per tire for mounting and balancing. Some shops charge extra if you bring your own tire instead of buying from them.
- Bicycle Tires: Usually the cheapest — around $10 – $20 for replacement at a local shop, or just the price of the tube (about $5 – $10) if you fix it yourself.
- Mower Tires: $15 – $30 per tire, depending on size and service type.
These prices can vary by region and service provider, but they give a realistic idea of the average cost to change a tire in most situations.
DIY vs Professional Service
If you have the right tools, changing a tire yourself can save a good amount of money. For a DIY tire change, your main cost is your time — plus basic tools like a jack, lug wrench, and air pump, which you may already own. Over time, these tools pay for themselves after just a few uses.
However, professional services offer some advantages:
- They use precision equipment to balance and align tires properly.
- They can detect hidden damage (like a bent rim or weak bead).
- It’s faster and less physically demanding.
So, if you’re confident and have safe working conditions, DIY is the most economical choice. But if you want guaranteed accuracy and speed, professional installation is worth the cost.
Conclusion
Knowing how to change a tire is one of the most practical and empowering skills any driver, rider, or vehicle owner can learn. It saves time, reduces stress, and helps you stay safe when unexpected situations happen on the road.
We’ve covered everything — from understanding how long it takes, the essential tools you’ll need, and detailed steps for cars, bikes, and motorcycles, to what it costs and how to avoid common mistakes. By following these simple, well-tested steps, you can handle most flat tires with confidence and care.
Regular maintenance, checking tire pressure, and keeping your emergency tools ready can make all the difference in avoiding roadside trouble. The more familiar you are with your vehicle’s tires, the easier it becomes to handle these minor challenges on your own.
Now that you know how to change a tire safely and confidently, you’ll never have to wait helplessly for roadside help again.